Showing posts with label oil pastel. Show all posts

Tuesday, January 24, 2017

Cityscapes

First graders are experimenting with a variety of materials to create their own cityscapes. After examining a slideshow of various examples of cityscapes created from different materials and brainstorming many objects or items we would see in a city, students are using the following materials at stations to develop their own unique cityscapes.

Newspapers: We discussed how columns of text, headlines, or even rectangular ads can appear like buildings in our mixed media cityscape.
Scrap Paper: Students have a large selection of colored and textured paper to choose from and even wall paper samples to create buildings, windows, or other elements within our cityscape.
Magazines: As students are looking through the magazines, we discuss proportion and how some images such as people may be too large for our cityscape and appear like giants next to our buildings. So, students are looking for images to cut out that would fit within our cityscape theme proportionately.
Chalk and Oil Pastels: Details can be added by drawing with the chalk and oil pastels. I am noticing most students are using these two materials to create their sky or enhance their newspaper or scrap paper buildings.
Cardboard Printing: Scraps of cardboard cut in various sizes can create the straight lines that we would see on buildings and skyscrapers within a cityscape. Students tap one side of the cardboard in black paint and stamp the cardboard on their paper to create rectangles, squares, and triangles for buildings, windows and doors within their cityscape. The goal is to create lines with cardboard not to paint and fill inside the buildings like a brush.
As students are working at each station to build their cityscape, we discuss how materials such as newspaper and magazines can overlap to create various areas of space within our mixed media art. By overlapping newspaper on top of our cardboard printing, some areas of our cityscape will appear up close while other areas will recede into the background.

Thursday, January 19, 2017

"Balanced" Hearts

Students in Kindergarten are creating a heart project that reinforces the vocabulary word balance and mosaic. We likened balance (symmetry) in art to a scale. When a piece of art is “heavy” on one side we feel that the art is out of balance, but when we find shapes to match the other half, it gives a feeling of balance. 

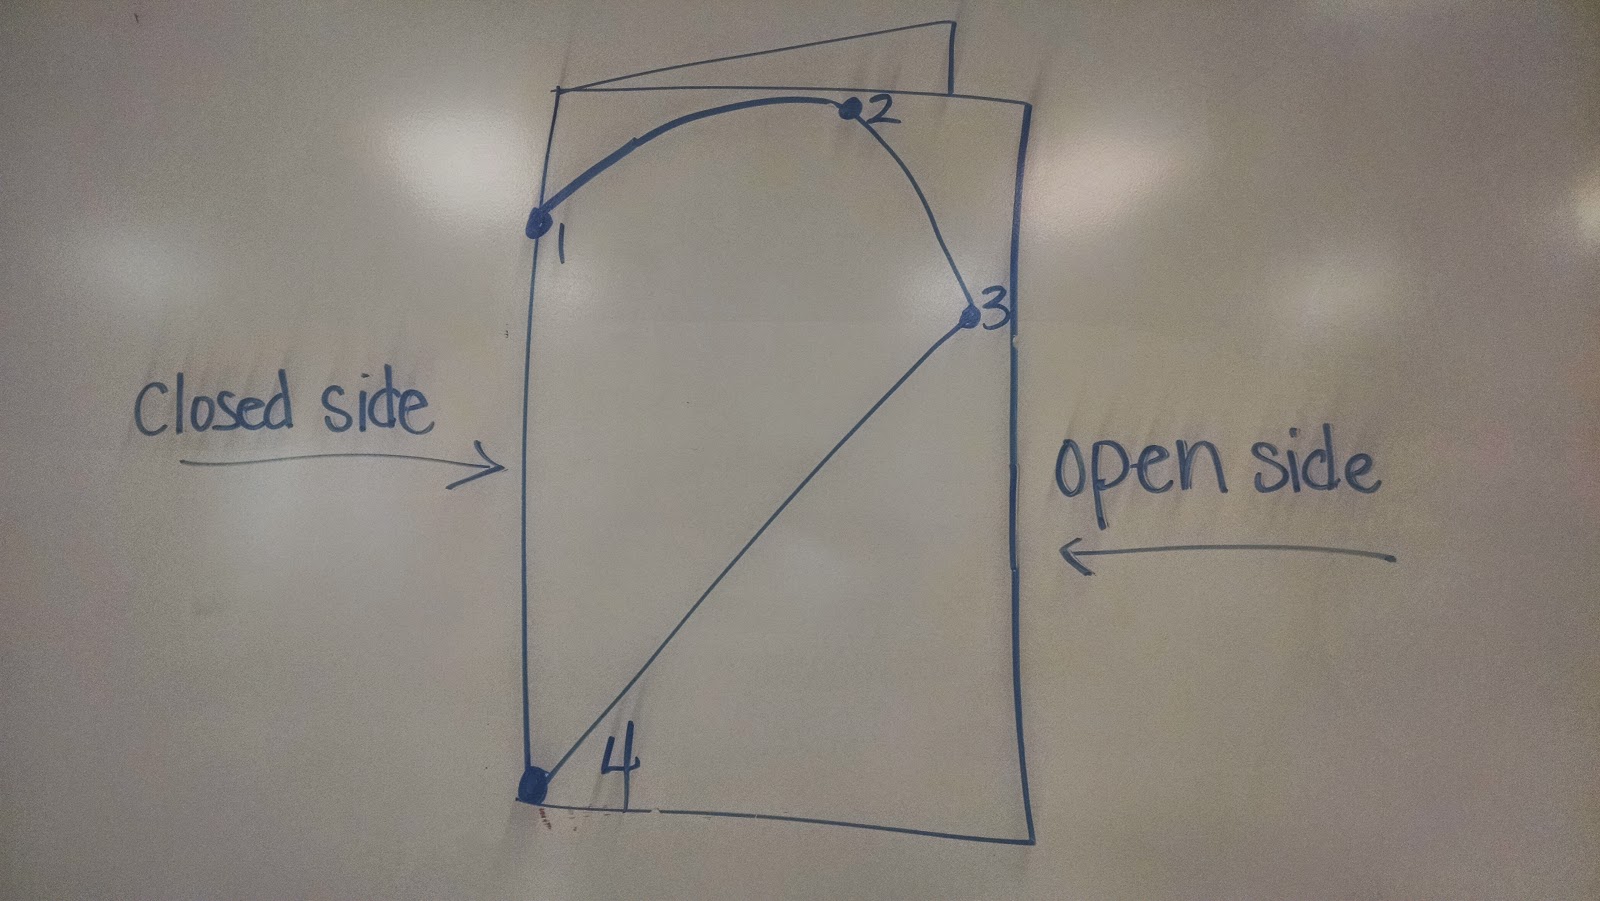
Once the concept of balance and symmetry was introduced, students created their own symmetrical balanced heart that has matching rather than lopsided halves. We first practiced on small 4"x4" red paper and then moved onto larger 12"x18" tag board. The first step was to fold our paper in half vertically (hamburger style). As a class, we discussed how our paper now has an open and closed side. On the closed side, students placed their five fingers (2 fingers for the smaller paper) pinkie at the top of the paper and made a dot below their thumb on the folded edge (closed side). 

Students drew half a heart starting with the dot along the edge and continued drawing their line to the top of the paper, to the far side, and back down to the bottom corner on the fold side. For students who had difficulty with this step, dots were drawn by the teacher and connected by the students (see photo below).

Once all papers were checked by the teacher for correctly starting and finishing on the fold side, students were able to cut on the heart line, cutting two papers at the same time, while the paper remained folded. If cutting and drawing were completed correctly, a symmetrical whole heart could be found when the students opened their papers. Sometimes, If I don't keep my eyes open, we could find two half hearts instead of one whole heart. This is what happens when students work on the open side instead of the fold side.
Oooops!
After creating our balanced and symmetrical heart shape, students then divided one half of their heart into sections by drawing straight lines from one side of their heart to the other side or from one black line to another black line with a black oil pastel to create a mosaic. The paper heart is then folded in half and rubbed with an old gift card to transfer symmetrical lines to the other half of the heart, ending with a mosaic effect. At the end of this week and next week, everyone will have the opportunity to paint inside each shape using tints and shades of one color (monochromatic color scheme). To make the paint values balanced and matching on both halves of the heart, students close their heart shape along the fold line after painting a shape. Students then rub to transfer the painted values to the opposite side of the heart making a "balanced" symmetrical shape.


When I purchase paint for my classroom, I rarely purchase secondary colors like orange, purple and green. I love color theory and really encourage my students to mix their own secondary colors, as well as any tints and shades they may need, even at the kindergarten level. For example, the heart below uses only purple and its tints and shades. To make purple, students must use the two primary colors red and blue in the right ratios to make purple. To keep it simple, students will only be working with a light, medium and dark value of one color. To use purple, it must be mixed from the primary colors, because I do not have any purple paint in my art room.
Crayola is not a sponsor of Art Teacher 101, but I really do like their paint! After the hearts are painted and dry, we will add them to a colored piece of construction paper matching the color used on the heart.

Thursday, January 28, 2016

Jim Dine Inspired Hearts

This kindergarten art project is inspired by the American pop artist, Jim Dine.  We viewed a few examples of similar heart paintings by this artist. Then, we recreated our own hearts using oil pastels and tempera paints on paper.
Jim Dine 2008 Merry Snow
We want to give this heart as a gift, so to make it extra fancy, we taped the outside edge with masking tape to create a white frame. When we are finished painting, the masking tape will be removed and a white frame will be revealed.  I like to tape to newspaper.  Not only does it keep the table clean while painting, but we can also glue our name label to the outside edge of the newspaper and see immediately whose painting belongs to whom in the drying rack.
Oil pastels used to free hand draw hearts on paper.
Once painting is complete, remove tape and see a white frame.
Our finished hearts will be uploaded to Artsonia, and we will use our handmade heart creations for a digital art project in the near future.

Thursday, November 12, 2015

Lots of Dots!

Continuing with our geometric shapes unit, kindergarten and first grade students cut circles from square pieces of paper. To introduce this lesson, we read the books "Lots of Dots" by Craig Frazier and "The Dot" by Peter H. Reynolds.
After reading these two books, we were inspired to create our own dots. Students first cut their dots from square pieces of paper. It was difficult for my kindergarteners to draw their own curved lines in the corners of the square paper, so a circle template was created so students could trace. This was even difficult for some students, because they have never traced before, so it was important to make sure students understood that when tracing a shape, we draw beside the shape we are tracing and not on top of it.
After cutting out our circles, we then discussed ABAB patterns and how to create a radial design on our circles using an ABAB pattern. This sounds incredibly challenging for kindergarten, but this group of students has already been introduced to ABAB patterns in their general classroom. We first made a small dot in the middle of our circle and added rings of circles around the center dot. Students could then decide what kind of pattern they wanted to use and draw with oil pastels. Some even wanted to try more challenging patterns like ABC or ABCD!
  
Each child will create two circles and glue back to back with a string sandwiched in the middle to create a mobile of hanging circles for our hallway.

SD Visual Art Standards:
Anchor Standard 1: Generate and conceptualize artistic ideas and work. 1.VA.Cr.1.1 Engage in creative art making using observation and investigation. 2.VA.Cr.1.1. Brainstorm and implement multiple approaches, materials, and tools to solve an art design problem driven by personal interests and curiosity or to re-purpose objects to make something new.
Anchor Standard 2 (K-2): Organize and develop artistic ideas and work. 1.VA.Cr.2.1. Explore safe uses of materials, tools, and procedures to create works of art or design.  2.VA.Cr.2.1 Experiment with various materials and tools while demonstrating safe use of materials, tools, and procedures to create works of art or design.

Monday, October 26, 2015

Fall Reflections

This lesson incorporates so many wonderful art terms from autumn, monotypes, and line of symmetry to warm versus cool colors and reflection. With kindergarten we focused on creating a fall reflection by folding our tag board in half and creating a line of symmetry. Whatever tree, leaves or grass we drew or painted on top of our line of symmetry, we wanted to reflect in the water below our line of symmetry. We looked at many photographs online that demonstrated this same line of symmetry. After demonstrating the process to students and discussing the definition of reflection, students started by folding their tag board in half horizontally and drawing "Y" trees with brown and black oil pastels above the line of symmetry (fold line). Students then folded their paper in half again and used old gift cards and scrapers to press the paper into the opposite side and transfer the images of the trees to the bottom half (below the line of symmetry which then reversed the image).
Students were encouraged to stand to use body weight to apply pressure when transferring.
The next day, students used fall colored paint and sponges to add leaves to the top portion of trees only above the line of symmetry. After finishing a color, students closed their paper and rubbed to transfer leaves to the lower portion of our picture, below the line of symmetry creating a reflection in the water.
The last step will be to paint the sky and water using blue tempera paint cakes and once dry will be ready to hang for Parent/Teacher Conferences in two weeks.
Idea from www.kinderart.com
SD Visual Art Standards:
Anchor Standard 1: Generate and conceptualize artistic ideas and work. 1.VA.Cr.1.1 Engage in creative art making using observation and investigation. 2.VA.Cr.1.1. Brainstorm and implement multiple approaches, materials, and tools to solve an art design problem driven by personal interests and curiosity or to re-purpose objects to make something new.
Anchor Standard 2 (K-2): Organize and develop artistic ideas and work. 1.VA.Cr.2.1. Explore safe uses of materials, tools, and procedures to create works of art or design.  2.VA.Cr.2.1 Experiment with various materials and tools while demonstrating safe use of materials, tools, and procedures to create works of art or design.
Anchor Standard 7 (K-2): Perceive and analyze artistic work. (examining photographs for line of symmetry and reflections)

Wednesday, May 13, 2015

Mother's Day Flowers

Kindergartners studied flower parts such as the pistil, anthers, stamen, stem, and leaves and discussed how fruit comes from seeds within the pistils. We also examined the art of Georgia O' Keefe and her "zoomed in" enlarged flowers. We framed the finished paintings on 12 x 18 inch colored construction paper and glued a Mother's day poem to the back. I hope all the mothers feel blessed by these beautiful creations.


Thursday, October 16, 2014

Fantasy Monsters (Scribble Drawings)

We are taking our scribble drawings to the next level and scribbling on larger paper (12"x18") to create an imaginary creature or monster from our scribble lines. Instead of tracing with black permanent markers like our previous creativity stretcher, we are tracing our creature/monster lines with black oil pastel. After tracing all our monster parts and adding details with the black oil pastels, students will add color to their monster and background with tempera cakes. Only a handful of students in my first grade class still have a difficult time finding images within the scribble lines. For this particular monster project, I encourage the students to use any of the lines or shapes created from the scribbles to make their Monster's head(s), body, and appendages. Once I point out numerous shapes within the scribbles that could be used, the student who was once challenged can immediately find their own shapes to create their own unique monster or creature. These drawing never fail to remind me of the imaginary creatures in Surrealist Artist Joan Miro's work. Ironically, he is our Artist of the Quarter for the 2nd nine weeks. Look for more information about Joan Miro and Joan Miro inspired projects to come soon...

1st grade monster with 4 heads.

Look at those sharp teeth!

Reminds me of a video game character.

This might be one of my favorites so far!
"People and Dog Before the Sun" by Joan Miro, 1949

Tuesday, September 30, 2014

Life is short. Eat dessert first!

My elementary students are almost finished with their Wayne Thiebaud inspired cakes and ice cream cones. I have many hanging on the wall in my hallway, with the quote "Life is short. Eat dessert first!" As we are completing the projects, I ask the students the following questions to make sure we are meeting the expectations for this project;

Do I have repetition (more than one shape, detail, or object repeating)?

Do I have a ground line (make sure my cake is not floating)?

Did I add details?

Did I trace my shapes and lines with bright colors (halation)?

Here are some of the amazing projects completed by my 2nd grade students. If you wish to see more student samples, you can view our online art gallery at Artsonia.

As art teachers may already know, students never finish at the same time.  If a child finishes early in my classroom, he or she may pick from a menu of art activities to reinforce facts learned about the Artist's life or utilize the artist's style.  Some of the activities include word searches, crossword puzzles, books about the artist's life or inspired by his/her images, and a drawing which involves the artist's style in some way.

The drawing activity for this particular artist requires students to draw their favorite meal and beverage (using a cylinder shape), include utensils and a ground line to reinforce our vocabulary and art skills from this lesson.

A list of anchor activities to complete when finished early. My first and second grade students are required to complete the drawing, but may choose any of the following items for themselves.