I don't know about you, but this cold weather has me dreaming about warmer days. We were spoiled not too long ago with warm temperatures hitting the 70's and wishful thoughts of flowers in bloom and leaves sprouting on trees, but then the true South Dakota reality of frigid temperatures returned with temperatures as low as the teens. Weeks like this make me wish for warmer days and these thoughts sometimes inspire activities in the art room.
Kindergarteners continued working with balance and symmetry and created beautiful butterflies to decorate and brighten our hallway. Students started by folding a large 12"x18" paper in half and using black tempera paint, drew one half of the butterfly's wing (number 3), folded their paper in half, rubbed the back, opened the paper again, and saw a completed butterfly with a symmetrical reflection on both halves.
After using black tempera to add shapes and lines to the wings (and then folding and rubbing to match the opposite side to create symmetry), students then used tempera paint cakes to add color to the wings continuing with the symmetry theme, mirroring their color choices. After papers dried, students had the choice of cutting out their butterflies or keeping the butterflies as is and painting a spring inspired background around the butterfly.
Kindergarteners (all four sections) also worked on a large collaborative mural, using tempera paint to create a spring scene. Students were given paint brushes and tempera paint and told to think spring! It turned out beautiful and can be seen just outside the kindergarten wing in our building. Because I do not purchase secondary colors for my classroom, when choosing orange, green or purple paint to use on the mural, students had to consider what primary colors were needed to mix.
Showing posts with label collaboration. Show all posts
Wednesday, March 15, 2017
Wednesday, January 18, 2017
Breaking News: It's all in the Landscape!
Second graders are using DoInk's Green Screen iPad app to create a news report on art vocabulary relating to space (the design element in art not the physical universe beyond the earth's atmosphere). Students examined landscapes from two artists; Pieter Bruegel the Elder (Netherlands) and Grant Wood (Iowa). Students are working in small groups to create their news report.
First step, examine a landscape painted by Grant Wood or Pieter Bruegel from one of the landscapes below. Step two, develop a skit and designate speaking parts as they would see in Reader's Theatre by writing Character’s Name, then colon or dash and finally speaking part. In the script, students must include the following art vocabulary; foreground, middle ground, background, overlapping, value, size, placement, and horizon line. Students must include the artist's name and year painted.
We also discussed how every great story needs a beginning, middle and end. Once groups have completed their scripts and assigned a camera person, their group may begin filming with the iPad using the DoInk Green Screen App. The landscape assigned to that group will be displayed behind the "Newscasters" onto the green screen as they point out the important information and vocabulary the group discovered while writing their script.
First step, examine a landscape painted by Grant Wood or Pieter Bruegel from one of the landscapes below. Step two, develop a skit and designate speaking parts as they would see in Reader's Theatre by writing Character’s Name, then colon or dash and finally speaking part. In the script, students must include the following art vocabulary; foreground, middle ground, background, overlapping, value, size, placement, and horizon line. Students must include the artist's name and year painted.
![]() |
| Pieter Bruegel the Elder, Winter Landscape with a Bird Trap 1565 |
![]() |
| Grant Wood, Young Corn 1931 |
![]() |
| Grant Wood, New Road 1939 |
![]() |
| Grant Wood, Fall Plowing 1931 |
| Pieter Bruegel the Elder, The Harvesters 1565 |
![]() |
| Script Checklist |
Tuesday, March 29, 2016
First Grade Neighborhoods
First graders collaborated on a neighborhood project. After
brainstorming a list of several items we might find in a neighborhood,
each table section worked together to create a neighborhood within a
city using pencils, crayons, colored pencils and permanent markers on 12" x 18" paper. Each
paper within a table section (four papers together) is connected to the next with streets, so access can be
gained to every home within the neighborhood.
Homes were made from origami paper squares. The step by step directions can be found in a previous post. Students added details to their homes such as windows, doors, and shingles and then glued to their 12" x18" paper.
After their neighborhoods were complete, table sections collaborated on a sign that would display the name of their neighborhood for all to see.
Homes were made from origami paper squares. The step by step directions can be found in a previous post. Students added details to their homes such as windows, doors, and shingles and then glued to their 12" x18" paper.
After their neighborhoods were complete, table sections collaborated on a sign that would display the name of their neighborhood for all to see.
Labels:
collaboration,
First Grade,
folding,
neighborhoods,
origami
Thursday, January 21, 2016
Norman Rockwell: Artist of the Quarter
Norman Rockwell is an amazing illustrator, an artist who tells stories using images. The artist was introduced to students through an examination of his "Triple Self Portrait" using VTS strategies.
To learn more about Norman Rockwell and his life, Kindergarten and First Grade students listened to the story "Norman Rockwell" written and illustrated by Mike Venezia from the "Getting to Know the World's Greatest Artists" Series.
After learning more about Norman Rockwell and his life, Kindergarten students worked as a class to develop a fictional story. Students have already started illustrating their book
pages. Each kindergarten class section has written a book and currently, each
student is assigned a page from the book to illustrate. Today, students
will be adding more details to their drawings with pencil and adding
color with crayons. Students may need help reading the words on their
assigned page as to remember what their assigned page says and
illustrate accordingly. Students were also asked to help each other brainstorm ideas
or details to add to their illustrations to make them better and to
make sure the picture or illustration is “telling a story” like our
artist Norman Rockwell.
First and Second grade students discovered an interesting comic on the front of the "Norman Rockwell" book written and illustrated by Mike Venezia.
I wanted to make sure students understood why this quote was so important, so we examined other art created around the same time of Norman Rockwell's illustrations and made notes using a Venn Diagram. I think the category that was most difficult for students was finding words to describe what was similar between Norman Rockwell's illustrations and the modern abstract artwork that was created at the same time.
First and Second grade students also designed a cover for "The Saturday Evening Post". This lesson puts the student in the role of illustrator with the assignment of designing a cover for “The Post”. Students were shown examples of Post covers by Norman Rockwell from the books in the above photo. Students were reminded that Norman Rockwell felt that the idea of a cover must be readily evident, the viewer should be able to understand the situation in about thirty seconds for the cover to have the desired impact. Grades K-3: Remember that the drawings may be only somewhat representational. Continue to be supportive of the efforts and open to spontaneous or unrealistic use of color. Next week, students will be creating Norman Rockwell inspired artwork of their own!
![]() |
| "Triple Self Portrait" by Norman Rockwell |
Visual
Thinking Strategies (VTS) allows each child to share what they see or
find in a piece of art and connect their findings to visual evidence
within the painting. Through VTS' rigorous group 'problem-solving'
process, students
cultivate a willingness and ability to present their own ideas, while
respecting and learning from the perspectives of their peers. Common
questions asked during a VTS discussion include:
What's going on in this picture?
What do you see that makes you say that?
What more can we find?
To learn more about Norman Rockwell and his life, Kindergarten and First Grade students listened to the story "Norman Rockwell" written and illustrated by Mike Venezia from the "Getting to Know the World's Greatest Artists" Series.
![]() |
| A selection of books from our public library about Norman Rockwell. |
First and Second grade students discovered an interesting comic on the front of the "Norman Rockwell" book written and illustrated by Mike Venezia.
![]() | ||
| "Hey Mr. Rockwell! Why don't you paint some cool modern stuff like us?" |
![]() |
| Working together in groups of 3-4, students compare art using a Venn Diagram. |
First and Second grade students also designed a cover for "The Saturday Evening Post". This lesson puts the student in the role of illustrator with the assignment of designing a cover for “The Post”. Students were shown examples of Post covers by Norman Rockwell from the books in the above photo. Students were reminded that Norman Rockwell felt that the idea of a cover must be readily evident, the viewer should be able to understand the situation in about thirty seconds for the cover to have the desired impact. Grades K-3: Remember that the drawings may be only somewhat representational. Continue to be supportive of the efforts and open to spontaneous or unrealistic use of color. Next week, students will be creating Norman Rockwell inspired artwork of their own!
![]() |
| "The Saturday Evening Post" Cover Design |
SD Visual Arts Standards
Anchor Standard 8: Interpret intent and meaning in artistic work.
K.VA.Re.8.1.a. Describe what an image represents.
1.VA.Re.8.1.a. Compare images that represent the same subject.
2.VA.Re.8.1.a. Categorize images based on expressive properties.
Wednesday, November 5, 2014
"The Illusion of Space" Activity
I tell my students all the time that artists use little tricks to create illusions in their art, such as creating an illusion that objects are up close and far away. By simply learning about these little magic tricks that artists' use, my students can also make their art appear to have the "illusion of space". This month's focus is the "Illusion of Space" and my little artists can make objects appear up close or far away by simply changing the value, location and size of objects in our landscapes. My SLO (Student Learning Objective) for this school year actually connects to the "Illusion of Space":
The first graders and kindergarteners used the same shapes for a quick activity, but instead of working in pairs like the second grade group, I made two landscape boards on large 18 by 24 inch paper. On the large paper, I drew three lines and wrote the words foreground, middle ground, background, and sky to separate the areas of space.
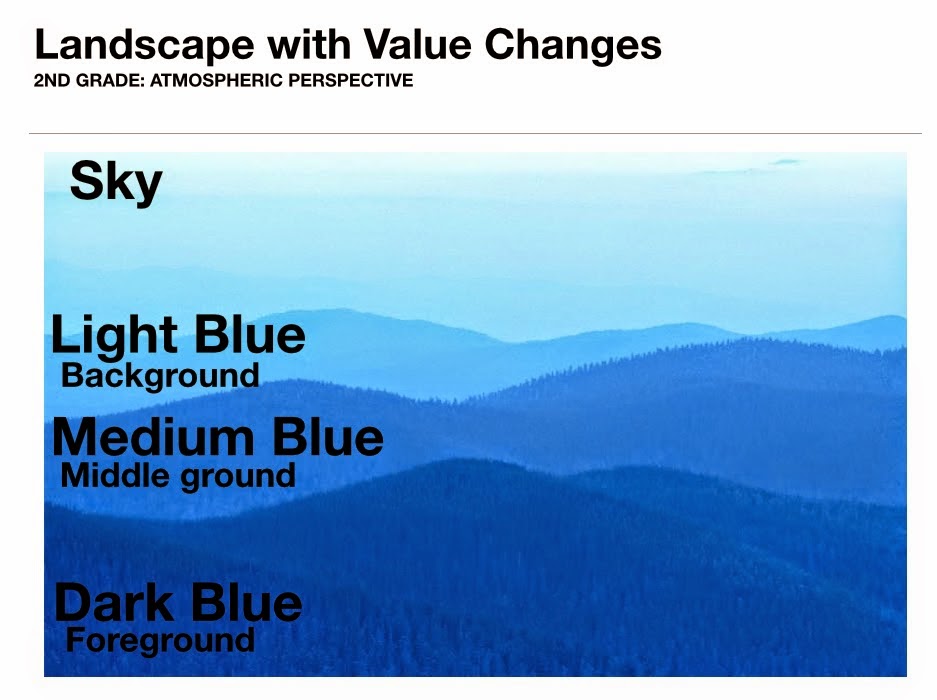
Each child was assigned one of the six objects from above and asked to assign it to the appropriate area of space. The class was divided in half with half the class working on each board. Students worked together to make sure each object was in its appropriate area of space according to what we just discussed about space; Objects in the foreground are larger than objects in the background (relative size), objects in the background are higher than objects in the foreground (position on the picture plane), and objects in the background are lighter than objects in the foreground (atmospheric perspective).
We looked at many examples of landscapes before completing this quick "space" activity. One of the pictures I used during my introduction was a landscape of blue hills at dusk. When students forgot that the blue rectangles were ground and assumed the pieces were part of the sky, I reminded them of the landscape from the introduction.
We also made a connection between Pieter Bruegel the Elder's "The Hunters in the Snow", painted in 1565, to Grant Wood's "Stone City, Iowa", created in 1930. Both are landscapes and both artists (although from different centuries) still used the same "space" skills we discussed to make parts of their paintings appear up close and far away.
Here are few quick videos (and when I say quick, I mean less than one minute) that I used as a resource to help demonstrate the "illusion of space" in art. I usually explain what to watch for within the video before even playing it, let them watch the video in its entirety, explain the items again to look for a second time, and replay the video a second time to maximize its effectiveness. There are other quick videos for the design elements and principles in the "Artist's Toolkit" to explore. My students love the quick videos because they have music and sound effects! I love the videos because they quickly and precisely teach an art skill!
SD Visual Arts Standards:
Anchor Standard 3: Refine and complete artistic work.
K.VA.Cr.3.1 Explain the process of making art while creating art.
1.VA.Cr.3.1 Use art vocabulary to describe choices while creating art (such as the elements and principles of design).
2.VA.Cr.3.1 Discuss and reflect with peers about choices made in creating artwork using art vocabulary (such as the elements and principles of design).
Anchor Standard 1: Generate and conceptualize artistic ideas and work.
1.VA.Cr.1.1 Engage in creative art making using observation and investigation.
2.VA.Cr.1.1 Brainstorm and implement multiple approaches, materials, and tools to solve an art or design problem.
95% of students from sections 2B and 2C will identify and demonstrate the illusion of space using specific art vocabulary: foreground, middle ground, background, horizon line, placement on paper (high/far and low/near) and size relationships (near/large and far/small).
Today and tomorrow, 2nd graders will be playing a little "space" game to help identify the areas of space using the objects below. The objects need to be organized according to how artists create space in a landscape using value and size relationships. The large blue rectangle shapes are the foreground, middle ground, and background areas of space while the large, medium, and small tree should be overlapping the appropriate area of space; large tree on dark blue foreground, medium sized tree on medium blue middle ground, and small tree on light blue background.
The first graders and kindergarteners used the same shapes for a quick activity, but instead of working in pairs like the second grade group, I made two landscape boards on large 18 by 24 inch paper. On the large paper, I drew three lines and wrote the words foreground, middle ground, background, and sky to separate the areas of space.
![]() |
| Words on the left from bottom to top; foreground, middle ground, background, and sky. |
![]() |
| Some students thought blue was for sky, but were reminded that it was our ground color. |
![]() |
| Kindergarteners working in groups of 8-10 students. |
We looked at many examples of landscapes before completing this quick "space" activity. One of the pictures I used during my introduction was a landscape of blue hills at dusk. When students forgot that the blue rectangles were ground and assumed the pieces were part of the sky, I reminded them of the landscape from the introduction.
We also made a connection between Pieter Bruegel the Elder's "The Hunters in the Snow", painted in 1565, to Grant Wood's "Stone City, Iowa", created in 1930. Both are landscapes and both artists (although from different centuries) still used the same "space" skills we discussed to make parts of their paintings appear up close and far away.
Here are few quick videos (and when I say quick, I mean less than one minute) that I used as a resource to help demonstrate the "illusion of space" in art. I usually explain what to watch for within the video before even playing it, let them watch the video in its entirety, explain the items again to look for a second time, and replay the video a second time to maximize its effectiveness. There are other quick videos for the design elements and principles in the "Artist's Toolkit" to explore. My students love the quick videos because they have music and sound effects! I love the videos because they quickly and precisely teach an art skill!
![]() |
| http://www.artsconnected.org/toolkit/watch_space_overlap.cfm |
![]() |
| http://www.artsconnected.org/toolkit/watch_space_perspective.cfm |
SD Visual Arts Standards:
Anchor Standard 3: Refine and complete artistic work.
K.VA.Cr.3.1 Explain the process of making art while creating art.
1.VA.Cr.3.1 Use art vocabulary to describe choices while creating art (such as the elements and principles of design).
2.VA.Cr.3.1 Discuss and reflect with peers about choices made in creating artwork using art vocabulary (such as the elements and principles of design).
Anchor Standard 1: Generate and conceptualize artistic ideas and work.
1.VA.Cr.1.1 Engage in creative art making using observation and investigation.
2.VA.Cr.1.1 Brainstorm and implement multiple approaches, materials, and tools to solve an art or design problem.
Thursday, October 9, 2014
Creativity Stretcher: "Pick a Shape" Activity
In 2012, IBM conducted interviews with 1,700 CEOs around the world and published the results in a paper titled “Leading through Connections”. Instead of looking for particular skills, most CEOs interviewed by IBM realized that they need employees who are able to thrive in change, by constantly learning and reinventing themselves. The four specific traits most desired are:
Out of Our Minds: Learning to be Creative. (Capstone Publishing Limited, 2001)
The Element: How Finding Your Passion Changes Everything. (Viking Adult, 2009)
This particular activity is a great way to challenge anyone's imagination at any age. I have even used this activity with adults as well as kindergarten students. As a matter of fact, this is the activity we are focusing on in art for the next couple of days grades kindergarten through second. Here are a list of supplies you will need for this particular "Pick a Shape" Creativity Stretcher.
Glue, Crayons, Writing Pencils, Drawing Paper, assorted precut geometric shapes (1-2 inches wide)
For the younger elementary students, I demonstrate the following steps before assigning to students. The whole class helps collaboratively brainstorm ideas for the shape I have chosen and any details I could add to make the object more recognizable. Here are some results from previous year's artists.
My kindergarteners practiced this activity on Wednesday and Thursday and will start a new "Pick a Shape" activity next week. My first and second grade students have tried this activity in the previous school year, so are familiar with my creativity stretchers.
- Collaboration
- Communication
- Creativity
- Flexibility
Out of Our Minds: Learning to be Creative. (Capstone Publishing Limited, 2001)
The Element: How Finding Your Passion Changes Everything. (Viking Adult, 2009)
This particular activity is a great way to challenge anyone's imagination at any age. I have even used this activity with adults as well as kindergarten students. As a matter of fact, this is the activity we are focusing on in art for the next couple of days grades kindergarten through second. Here are a list of supplies you will need for this particular "Pick a Shape" Creativity Stretcher.
Glue, Crayons, Writing Pencils, Drawing Paper, assorted precut geometric shapes (1-2 inches wide)
For the younger elementary students, I demonstrate the following steps before assigning to students. The whole class helps collaboratively brainstorm ideas for the shape I have chosen and any details I could add to make the object more recognizable. Here are some results from previous year's artists.
My kindergarteners practiced this activity on Wednesday and Thursday and will start a new "Pick a Shape" activity next week. My first and second grade students have tried this activity in the previous school year, so are familiar with my creativity stretchers.
- Teacher hands out 9x12 inch drawing paper, one per student. Students write their FIRST NAME, LAST NAME and GRADE (2D) on back. Remind students to do a thumbs up high in the air to show they have completed this step. Teacher checks papers. Kindergarten students are only required to write their first name and grade, while first and second grade students are required to write their first name, last name, and grade.
- Once completed with name and grade (while you are checking papers), allow students to choose one geometric shape from a ziplock gallon bag of pre-cut construction paper shapes. Students then glue the shape to the 9x12 inch drawing paper. Remind students one to two dots of glue; Dot, Dot, not a lot.
- Using their imagination, students must turn that shape into an object, creature or animal of some sort. Encourage individuality and diversity. Encourage them NOT to copy their neighbors, but to be unique. Encourage students to add details. Details are extras such as where the object is located; inside or outside. What other things might we see with the object? Is it a sunny day or cloudy day? etc. Students may add color with crayons. Art supply inspectors (ASI) will grab these supplies from the art supply shelf and bring to their table sections.
- Five minutes before end of class, clean up begins. Art Supply Inspector makes sure pencils, glue bottles, and crayons are back on supply shelf. At the end of class, call quiet table sections to place their papers in the drying rack to prevent papers from sticking together.
Labels:
collaboration,
confidence,
creativity,
creativity stretcher,
details,
imagination,
shapes
Tuesday, October 7, 2014
Scavenger Hunt (Rainbow Club Day Reward)
My 2nd graders earned over 40 Rainbow Club points for the month of September and were rewarded with a "Design Elements" scavenger hunt activity. I found this nifty "design elements" scavenger hunt at The Art of Education (AOE) and tweaked it to fit my classroom needs, including images next to some of the words for my lower level readers. Students used iPads and worked in groups of three to four students to find the items on the list, zoom in close, and photograph. We not only searched the art room, but traveled all the way down to the main office looking for items from our list.
Next class period, working in their same groups, students will create a word photo collage using the images from last class period's scavenger hunt. The app they will be using is called WordFoto. Students will find an image and use the bolded word from the scavenger hunt list to fill the image with words (see example below). I hope to use this app again for other projects in the art room. I have some great ideas for the future, the possibilities are endless.
This example below is one created by a 2nd grade student's photo. She selected this fire alarm because it was a rectangle and found it in a hallway on the way to art. In WordFoto, she selected the image from the photo library on the iPad, cropped it, and created a new word set with "rectangle". The app does the rest!
Labels:
collaboration,
design elements,
iPads,
photography,
Rainbow Club,
Scavenger Hunt,
WordFoto
Subscribe to:
Posts (Atom)