Showing posts with label design elements. Show all posts

Monday, February 20, 2017

Landscape Newscasts

I finally finished loading all the green screen landscape news reports to four movies, one movie for each 2nd grade section. Students are so excited to finally have their videos on YouTube. For this project, students were divided into groups of four to five students, together they were assigned one landscape from two artists; Grant Wood or Peiter Bruegel the Elder, and wrote a script before recording their video. Their script needed to include the following descriptions; horizon line, foreground, middle ground, background, overlapping, placement, size, and value. See my previous post explaining this project.

2A Landscape News

2B Landscape News

2C Landscape News

2D Landscape News

Wednesday, January 18, 2017

Breaking News: It's all in the Landscape!

Second graders are using DoInk's Green Screen iPad app to create a news report on art vocabulary relating to space (the design element in art not the physical universe beyond the earth's atmosphere). Students examined landscapes from two artists; Pieter Bruegel the Elder (Netherlands) and Grant Wood (Iowa). Students are working in small groups to create their news report. 


First step, examine a landscape painted by Grant Wood or Pieter Bruegel from one of the landscapes below. Step two, develop a skit and designate speaking parts as they would see in Reader's Theatre by writing Character’s Name, then colon or dash and finally speaking part. In the script, students must include the following art vocabulary; foreground, middle ground, background, overlapping, value, size, placement, and horizon line. Students must include the artist's name and year painted. 
Pieter Bruegel the Elder, Winter Landscape with a Bird Trap 1565
Grant Wood, Young Corn 1931
Grant Wood, New Road 1939
Grant Wood, Fall Plowing 1931
Pieter Bruegel the Elder, The Harvesters 1565
We also discussed how every great story needs a beginning, middle and end. Once groups have completed their scripts and assigned a camera person, their group may begin filming with the iPad using the DoInk Green Screen App. The landscape assigned to that group will be displayed behind the "Newscasters" onto the green screen as they point out the important information and vocabulary the group discovered while writing their script.
Script Checklist

Thursday, September 22, 2016

Lines, Lines, and more Lines!

I must admit that this lesson idea is not my own, but an idea I borrowed from the great Cassie Stephens at  "What the Art Teacher Wore" blog.  Line is one of six basic design elements in art and students learn about new line vocabulary at the kindergarten level through this lesson and my first and second graders can review their basic line vocabulary as we paint, draw, and sculpt various different lines.  First, kindergarten students are introduced to basic line vocabulary through a poem called "Larry the Line" written by Cassie Stephens.

Larry the Line
Is a friend of mine 
(creating a snake by opening the fingers of your hand, puppet style and there's your snake!)
He can make three
(hold up a three with your fingers)
Straight lines for me!
Ver-tickle
(create a vertical line with your forearm)
Diagonal and horizontal!
(pantomime each)
Any curve, he can learn
With a twist and a turn.
When he's out of his tangle
he makes a great...angle.
(created by placing your hand on your hip and pointing to your elbow)
Any line, he can make
After all, he's a snake! 

After learning the Larry the Line poem, students receive a demonstration on painting. Cassie Stephens likens the bristles of the paint brush to a ballerina: It always dances on it's toes and never scoots around on it's bottom. We also discuss how we dip only the tip of our brush in the paint and never smash Mr. Brush's hairs for that will give him one bad hair day and an awful headache! After demonstrating how to paint a zig zag, wavy, straight, dotted, and dashed line, the students paint the same lines on their own paper using black tempera paint.

Kindergarten add colors of their choosing.
On the next day of this unit, kindergarteners were introduced to our tempera paint cakes.  Students were reminded to use lots of water to activate the tempera cakes and how to clean the brush before choosing another color. 


My first and second graders are also reviewing lines, painting, and brush procedures with a Kandinsky inspired art lesson. On the first day, we examined one of Kandinsky's Compositions using Visual Thinking Strategies (VTS). We also discussed key life facts like where he was born, what inspired him, what was going on during his life, etc. with a keynote presentation. Over the course of 3-4 art classes, students painted chinet plates (perfect plates for painting because of its stiff texture) with Kandinsky inspired concentric circles. We also discussed how radial designs can also appear circular like Kandinsky's concentric circles. Once the plates are painted and patterned, my first and second graders will turn these paper plates into looms and weave. I will be honest, I am a little nervous about teaching first and second graders how to weave. Can you imagine the chaos, but we are going to give it a try!

Friday, November 7, 2014

Winter Landscapes

With the threat of snow looming next week, students are preparing papers for a winter landscape. Just this week, we have been focusing on little tricks that artists use to create the illusion of space, atmospheric perspective being one example.  After examining Pieter Bruegel's "Hunters in the Snow" landscape and Grant Wood's "Stone City, Iowa" landscape for depth, students were inspired to create their own landscapes.


Once we reviewed how objects in the foreground are darker and larger than objects in the background, 2nd graders were given three plates, white and blue paint and asked to create three values for their snowy winter landscape making a foreground, middle ground, and background.


Next week, students will be adding trees and other details to complete their winter landscapes.

Wednesday, November 5, 2014

"The Illusion of Space" Activity

I tell my students all the time that artists use little tricks to create illusions in their art, such as creating an illusion that objects are up close and far away. By simply learning about these little magic tricks that artists' use, my students can also make their art appear to have the "illusion of space". This month's focus is the "Illusion of Space" and my little artists can make objects appear up close or far away by simply changing the value, location and size of objects in our landscapes. My SLO (Student Learning Objective) for this school year actually connects to the "Illusion of Space":

95% of students from sections 2B and 2C will identify and demonstrate the illusion of space using specific art vocabulary: foreground, middle ground, background, horizon line, placement on paper (high/far and low/near) and size relationships (near/large and far/small).

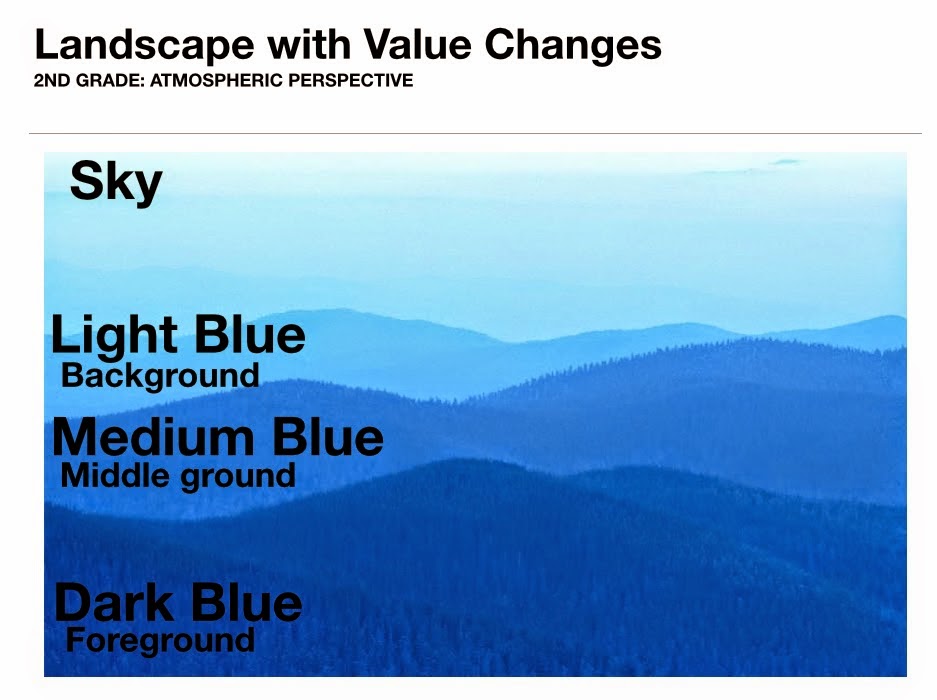
Today and tomorrow, 2nd graders will be playing a little "space" game to help identify the areas of space using the objects below. The objects need to be organized according to how artists create space in a landscape using value and size relationships. The large blue rectangle shapes are the foreground, middle ground, and background areas of space while the large, medium, and small tree should be overlapping the appropriate area of space; large tree on dark blue foreground, medium sized tree on medium blue middle ground, and small tree on light blue background.


The first graders and kindergarteners used the same shapes for a quick activity, but instead of working in pairs like the second grade group, I made two landscape boards on large 18 by 24 inch paper. On the large paper, I drew three lines and wrote the words foreground, middle ground, background, and sky to separate the areas of space.

Words on the left from bottom to top; foreground, middle ground, background, and sky.
Each child was assigned one of the six objects from above and asked to assign it to the appropriate area of space. The class was divided in half with half the class working on each board.  Students worked together to make sure each object was in its appropriate area of space according to what we just discussed about space; Objects in the foreground are larger than objects in the background (relative size), objects in the background are higher than objects in the foreground (position on the picture plane), and objects in the background are lighter than objects in the foreground (atmospheric perspective).
Some students thought blue was for sky, but were reminded that it was our ground color.
Kindergarteners working in groups of 8-10 students.


We looked at many examples of landscapes before completing this quick "space" activity. One of the pictures I used during my introduction was a landscape of blue hills at dusk. When students forgot that the blue rectangles were ground and assumed the pieces were part of the sky, I reminded them of the landscape from the introduction.

We also made a connection between Pieter Bruegel the Elder's "The Hunters in the Snow", painted in 1565, to Grant Wood's "Stone City, Iowa", created in 1930. Both are landscapes and both artists (although from different centuries) still used the same "space" skills we discussed to make parts of their paintings appear up close and far away.

Here are few quick videos (and when I say quick, I mean less than one minute) that I used as a resource to help demonstrate the "illusion of space" in art. I usually explain what to watch for within the video before even playing it, let them watch the video in its entirety, explain the items again to look for a second time, and replay the video a second time to maximize its effectiveness. There are other quick videos for the design elements and principles in the "Artist's Toolkit" to explore. My students love the quick videos because they have music and sound effects! I love the videos because they quickly and precisely teach an art skill!

http://www.artsconnected.org/toolkit/watch_space_overlap.cfm
http://www.artsconnected.org/toolkit/watch_space_perspective.cfm

SD Visual Arts Standards:
Anchor Standard 3: Refine and complete artistic work.
K.VA.Cr.3.1 Explain the process of making art while creating art.
1.VA.Cr.3.1 Use art vocabulary to describe choices while creating art (such as the elements and principles of design).
2.VA.Cr.3.1 Discuss and reflect with peers about choices made in creating artwork using art vocabulary (such as the elements and principles of design).

Anchor Standard 1: Generate and conceptualize artistic ideas and work.
1.VA.Cr.1.1 Engage in creative art making using observation and investigation.
2.VA.Cr.1.1 Brainstorm and implement multiple approaches, materials, and tools to solve an art or design problem.


Tuesday, October 7, 2014

Scavenger Hunt (Rainbow Club Day Reward)


My 2nd graders earned over 40 Rainbow Club points for the month of September and were rewarded with a "Design Elements" scavenger hunt activity.  I found this nifty "design elements" scavenger hunt at The Art of Education (AOE) and tweaked it to fit my classroom needs, including images next to some of the words for my lower level readers. Students used iPads and worked in groups of three to four students to find the items on the list, zoom in close, and photograph. We not only searched the art room, but traveled all the way down to the main office looking for items from our list.


Next class period, working in their same groups, students will create a word photo collage using the images from last class period's scavenger hunt. The app they will be using is called WordFoto. Students will find an image and use the bolded word from the scavenger hunt list to fill the image with words (see example below). I hope to use this app again for other projects in the art room. I have some great ideas for the future, the possibilities are endless.


This example below is one created by a 2nd grade student's photo. She selected this fire alarm because it was a rectangle and found it in a hallway on the way to art. In WordFoto, she selected the image from the photo library on the iPad, cropped it, and created a new word set with "rectangle".  The app does the rest!